Настройка UINavigationBar и кнопки Назад
я следовал учебнику ниже, чтобы настроить UINavigationBar.
http://foobarpig.com/iphone/uinavigationbar-with-solid-color-or-image-background.html
я применил фоновое изображение в UINavigationBar, однако я не знаю, как настроить кнопку "Назад". На данный момент кнопка "назад" по умолчанию не подходит для внешнего вида настроенного UINavigationBar.
пожалуйста, научите меня, как изменить цвет фона или изображение кнопки "назад" по умолчанию. Спасибо.

4 ответов
я написал следующие категории, чтобы настроить кнопку "Назад":
UIBarButtonItem + StyledButton.h
@interface UIBarButtonItem (StyledButton)
+ (UIBarButtonItem *)styledBackBarButtonItemWithTarget:(id)target selector:(SEL)selector;
+ (UIBarButtonItem *)styledCancelBarButtonItemWithTarget:(id)target selector:(SEL)selector;
+ (UIBarButtonItem *)styledSubmitBarButtonItemWithTitle:(NSString *)title target:(id)target selector:(SEL)selector;
@end
UIBarButtonItem + StyledButton.м
@implementation UIBarButtonItem (StyledButton)

+ (UIBarButtonItem *)styledBackBarButtonItemWithTarget:(id)target selector:(SEL)selector;
{
   UIImage *image = [UIImage imageNamed:@"button_back"];
   image = [image stretchableImageWithLeftCapWidth:20.0f topCapHeight:20.0f];

   NSString *title = NSLocalizedString(@"Back", nil);
   UIFont *font = [UIFont boldSystemFontOfSize:12.0f];

   UIButton *button = [UIButton styledButtonWithBackgroundImage:image font:font title:title target:target selector:selector];
   button.titleLabel.textColor = [UIColor blackColor];

   CGSize textSize = [title sizeWithFont:font];
   CGFloat margin = (button.frame.size.height - textSize.height) / 2;
   CGFloat marginRight = 7.0f;
   CGFloat marginLeft = button.frame.size.width - textSize.width - marginRight;
   [button setTitleEdgeInsets:UIEdgeInsetsMake(margin, marginLeft, margin, marginRight)];
   [button setTitleColor:[UIColor colorWithRed:53.0f/255.0f green:77.0f/255.0f blue:99.0f/255.0f alpha:1.0f] forState:UIControlStateNormal];

   return [[[UIBarButtonItem alloc] initWithCustomView:button] autorelease];
}

+ (UIBarButtonItem *)styledCancelBarButtonItemWithTarget:(id)target selector:(SEL)selector;
{
   UIImage *image = [UIImage imageNamed:@"button_square"];
   image = [image stretchableImageWithLeftCapWidth:20.0f topCapHeight:20.0f];

   NSString *title = NSLocalizedString(@"Cancel", nil);
   UIFont *font = [UIFont boldSystemFontOfSize:12.0f];

   UIButton *button = [UIButton styledButtonWithBackgroundImage:image font:font title:title target:target selector:selector];
   button.titleLabel.textColor = [UIColor blackColor];
   [button setTitleColor:[UIColor colorWithRed:53.0f/255.0f green:77.0f/255.0f blue:99.0f/255.0f alpha:1.0f] forState:UIControlStateNormal];

   return [[[UIBarButtonItem alloc] initWithCustomView:button] autorelease];
}

+ (UIBarButtonItem *)styledSubmitBarButtonItemWithTitle:(NSString *)title target:(id)target selector:(SEL)selector;
{
   UIImage *image = [UIImage imageNamed:@"button_submit"];
   image = [image stretchableImageWithLeftCapWidth:20.0f topCapHeight:20.0f];

   UIFont *font = [UIFont boldSystemFontOfSize:12.0f];

   UIButton *button = [UIButton styledButtonWithBackgroundImage:image font:font title:title target:target selector:selector];
   button.titleLabel.textColor = [UIColor whiteColor];
   [button setTitleColor:[UIColor whiteColor] forState:UIControlStateNormal];

   return [[[UIBarButtonItem alloc] initWithCustomView:button] autorelease];
}
UIButton + StyledButton.h
@interface UIButton (UIButton_StyledButton)
+ (UIButton *)styledButtonWithBackgroundImage:(UIImage *)image font:(UIFont *)font title:(NSString *)title target:(id)target selector:(SEL)selector;
@end
UIButton + StyledButton.м
@implementation UIButton (UIButton_StyledButton)

+ (UIButton *)styledButtonWithBackgroundImage:(UIImage *)image font:(UIFont *)font title:(NSString *)title target:(id)target selector:(SEL)selector
{
   CGSize textSize = [title sizeWithFont:font];
   CGSize buttonSize = CGSizeMake(textSize.width + 20.0f, image.size.width);

   UIButton *button = [[[UIButton alloc] initWithFrame:CGRectMake(0.0f, 0.0f, buttonSize.width, buttonSize.height)] autorelease];
   [button addTarget:target action:selector forControlEvents:UIControlEventTouchUpInside];
   [button setBackgroundImage:image forState:UIControlStateNormal];
   [button setTitle:title forState:UIControlStateNormal];
   [button.titleLabel setFont:font];

   return button;
}

@end
это простой в использовании, например:
- (void)viewDidLoad
{
   [super viewDidLoad];

   self.navigationItem.leftBarButtonItem = [UIBarButtonItem styledBackBarButtonItemWithTarget:self selector:@selector(dismissModalViewController)];
   self.navigationItem.rightBarButtonItem = [UIBarButtonItem styledSubmitBarButtonItemWithTitle:NSLocalizedString(@"Done", nil) target:self selector:@selector(doneButtonTouched:)];
}
Вышеуказанный код от проект, который все еще работает, поэтому его можно немного очистить, но он работает так, как должен. Используйте изображения без текста в качестве кнопок и убедитесь, что они эластичный (т. е. не делайте снимки слишком мал и будьте осторожны с градиентами). Изображение кнопки "Назад" в следующем примере составляет всего 31 x 30 пикселей, но оно растянуто, чтобы текст соответствовал.
некоторые примеры результатов:
обратно кнопка
кнопки Отмена / готово
я использовал этот код несколько раз:
- (void)viewDidLoad {
    [super viewDidLoad];

    // Set the custom back button
    UIImage *buttonImage = [UIImage imageNamed:@"back_button.png"];

    //create the button and assign the image
    UIButton *button = [UIButton buttonWithType:UIButtonTypeCustom];
    [button setImage:buttonImage forState:UIControlStateNormal];

    //set the frame of the button to the size of the image (see note below)
    button.frame = CGRectMake(0, 0, buttonImage.size.width, buttonImage.size.height);

    [button addTarget:self action:@selector(back) forControlEvents:UIControlEventTouchUpInside];

    //create a UIBarButtonItem with the button as a custom view
    UIBarButtonItem *customBarItem = [[UIBarButtonItem alloc] initWithCustomView:button];
    self.navigationItem.leftBarButtonItem = customBarItem;

 // Cleanup
 [customBarItem release];
}

-(void)back {
    // Tell the controller to go back
    [self.navigationController popViewControllerAnimated:YES];
}
С этой сайт. Надеюсь, это поможет!
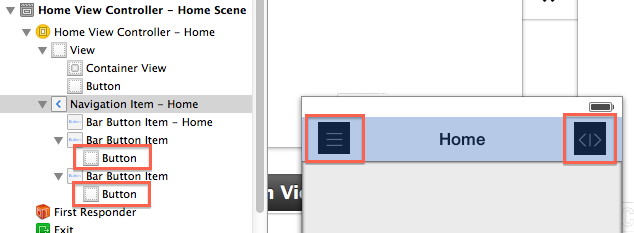
вот что вы делаете.
1) добавьте пользовательские кнопки в элемент навигации в Построителе интерфейса:

2) в коде сделать следующее:
#define IS_IOS7  ([[[UIDevice currentDevice] systemVersion] compare:@"7.0" options:NSNumericSearch] != NSOrderedAscending)

- (void)viewDidLayoutSubviews {

    [super viewDidLayoutSubviews];

    if (IS_IOS7) {

        [self shiftView:self.navigationItem.leftBarButtonItem.customView horizontallyBy:-11];
        [self shiftView:self.navigationItem.rightBarButtonItem.customView horizontallyBy:11];
    }
}

- (void)shiftView:(UIView*)view horizontallyBy:(int)offset {
      CGRect frame = view.frame;
      frame.origin.y += offset;
      view.frame = frame;
}


