Смешивание не удаляет швы в OpenCV
Я пытаюсь смешать 2 изображения, чтобы швы между ними исчезли.
1-я изображения: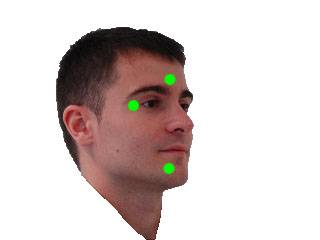
2-я изображения: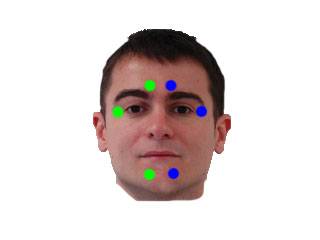
если смешивать не applied: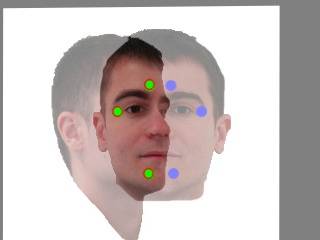
если купажирования применяются: 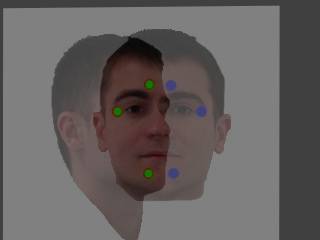
Я АЛЬФА-СМЕШИВАНИЕ; нет шов удален; на самом деле изображение ВСЕ ТОТ ЖЕ, НО ТЕМНЕЕ
это часть, где я делаю смешивание
Mat warped1;
warpPerspective(left,warped1,perspectiveTransform,front.size());// Warping may be used for correcting image distortion
imshow("combined1",warped1/2+front/2);
            vector<Mat> imgs;
            imgs.push_back(warped1/2);
            imgs.push_back(front/2);
            double alpha = 0.5;
            int min_x = ( imgs[0].cols - imgs[1].cols)/2 ;
            int min_y = ( imgs[0].rows -imgs[1].rows)/2 ;
            int width, height;
            if(min_x < 0) {
                min_x = 0;
                width = (imgs).at(0).cols;
            }
            else
                width = (imgs).at(1).cols;
            if(min_y < 0) {
                min_y = 0;
                height = (imgs).at(0).rows - 1;
            }

            else
                height = (imgs).at(1).rows - 1;
            Rect roi = cv::Rect(min_x, min_y, imgs[1].cols, imgs[1].rows);
            Mat out_image = imgs[0].clone();
            Mat A_roi= imgs[0](roi);
            Mat out_image_roi = out_image(roi);
            addWeighted(A_roi,alpha,imgs[1],1-alpha,0.0,out_image_roi);
            imshow("foo",imgs[0](roi));
4 ответов
Я выбираю определение Альфа-значения в зависимости от расстояния до "центра объекта", чем дальше расстояние от центра объекта, тем меньше Альфа-значение. "Объект" определяется маской.
я выровнял изображения с GIMP (аналогично вашему warpPerspective). Они должны быть в одной системе координат, и оба изображения должны иметь одинаковый размер.
мои входные изображения выглядят так это:

int main()
{

cv::Mat i1 = cv::imread("blending/i1_2.png");
cv::Mat i2 = cv::imread("blending/i2_2.png");

cv::Mat m1 = cv::imread("blending/i1_2.png",CV_LOAD_IMAGE_GRAYSCALE);
cv::Mat m2 = cv::imread("blending/i2_2.png",CV_LOAD_IMAGE_GRAYSCALE);

    // works too, for background near white
    //  m1 = m1 < 220;
    //  m2 = m2 < 220;

//    edited:  using OTSU thresholding. If not working you have to create your own masks with a better technique
cv::threshold(m1,m1,255,255,cv::THRESH_BINARY_INV|cv::THRESH_OTSU);
cv::threshold(m2,m2,255,255,cv::THRESH_BINARY_INV|cv::THRESH_OTSU);

cv::Mat out = computeAlphaBlending(i1,m1,i2,m2);

cv::waitKey(-1);
return 0;
}
С функцией смешивания : мне нужны некоторые комментарии и оптимизации, я думаю, я добавлю их позже.
cv::Mat computeAlphaBlending(cv::Mat image1, cv::Mat mask1, cv::Mat image2, cv::Mat mask2)
{
// edited: find regions where no mask is set
// compute the region where no mask is set at all, to use those color values unblended
cv::Mat bothMasks = mask1 | mask2;
cv::imshow("maskOR",bothMasks);
cv::Mat noMask = 255-bothMasks;
// ------------------------------------------

// create an image with equal alpha values:
cv::Mat rawAlpha = cv::Mat(noMask.rows, noMask.cols, CV_32FC1);
rawAlpha = 1.0f;

// invert the border, so that border values are 0 ... this is needed for the distance transform
cv::Mat border1 = 255-border(mask1);
cv::Mat border2 = 255-border(mask2);

// show the immediate results for debugging and verification, should be an image where the border of the face is black, rest is white
cv::imshow("b1", border1);
cv::imshow("b2", border2);

// compute the distance to the object center
cv::Mat dist1;
cv::distanceTransform(border1,dist1,CV_DIST_L2, 3);

// scale distances to values between 0 and 1
double min, max; cv::Point minLoc, maxLoc;

// find min/max vals
cv::minMaxLoc(dist1,&min,&max, &minLoc, &maxLoc, mask1&(dist1>0));  // edited: find min values > 0
dist1 = dist1* 1.0/max; // values between 0 and 1 since min val should alwaysbe 0

// same for the 2nd image
cv::Mat dist2;
cv::distanceTransform(border2,dist2,CV_DIST_L2, 3);
cv::minMaxLoc(dist2,&min,&max, &minLoc, &maxLoc, mask2&(dist2>0));  // edited: find min values > 0
dist2 = dist2*1.0/max;  // values between 0 and 1


//TODO: now, the exact border has value 0 too... to fix that, enter very small values wherever border pixel is set...

// mask the distance values to reduce information to masked regions
cv::Mat dist1Masked;
rawAlpha.copyTo(dist1Masked,noMask);    // edited: where no mask is set, blend with equal values
dist1.copyTo(dist1Masked,mask1);
rawAlpha.copyTo(dist1Masked,mask1&(255-mask2)); //edited

cv::Mat dist2Masked;
rawAlpha.copyTo(dist2Masked,noMask);    // edited: where no mask is set, blend with equal values
dist2.copyTo(dist2Masked,mask2);
rawAlpha.copyTo(dist2Masked,mask2&(255-mask1)); //edited

cv::imshow("d1", dist1Masked);
cv::imshow("d2", dist2Masked);

// dist1Masked and dist2Masked now hold the "quality" of the pixel of the image, so the higher the value, the more of that pixels information should be kept after blending
// problem: these quality weights don't build a linear combination yet

// you want a linear combination of both image's pixel values, so at the end you have to divide by the sum of both weights
cv::Mat blendMaskSum = dist1Masked+dist2Masked;
//cv::imshow("blendmask==0",(blendMaskSum==0));

// you have to convert the images to float to multiply with the weight
cv::Mat im1Float;
image1.convertTo(im1Float,dist1Masked.type());
cv::imshow("im1Float", im1Float/255.0);

// TODO: you could replace those splitting and merging if you just duplicate the channel of dist1Masked and dist2Masked
// the splitting is just used here to use .mul later... which needs same number of channels
std::vector<cv::Mat> channels1;
cv::split(im1Float,channels1);
// multiply pixel value with the quality weights for image 1
cv::Mat im1AlphaB = dist1Masked.mul(channels1[0]);
cv::Mat im1AlphaG = dist1Masked.mul(channels1[1]);
cv::Mat im1AlphaR = dist1Masked.mul(channels1[2]);

std::vector<cv::Mat> alpha1;
alpha1.push_back(im1AlphaB);
alpha1.push_back(im1AlphaG);
alpha1.push_back(im1AlphaR);
cv::Mat im1Alpha;
cv::merge(alpha1,im1Alpha);
cv::imshow("alpha1", im1Alpha/255.0);

cv::Mat im2Float;
image2.convertTo(im2Float,dist2Masked.type());

std::vector<cv::Mat> channels2;
cv::split(im2Float,channels2);
// multiply pixel value with the quality weights for image 2
cv::Mat im2AlphaB = dist2Masked.mul(channels2[0]);
cv::Mat im2AlphaG = dist2Masked.mul(channels2[1]);
cv::Mat im2AlphaR = dist2Masked.mul(channels2[2]);

std::vector<cv::Mat> alpha2;
alpha2.push_back(im2AlphaB);
alpha2.push_back(im2AlphaG);
alpha2.push_back(im2AlphaR);
cv::Mat im2Alpha;
cv::merge(alpha2,im2Alpha);
cv::imshow("alpha2", im2Alpha/255.0);

// now sum both weighted images and divide by the sum of the weights (linear combination)
cv::Mat imBlendedB = (im1AlphaB + im2AlphaB)/blendMaskSum;
cv::Mat imBlendedG = (im1AlphaG + im2AlphaG)/blendMaskSum;
cv::Mat imBlendedR = (im1AlphaR + im2AlphaR)/blendMaskSum;
std::vector<cv::Mat> channelsBlended;
channelsBlended.push_back(imBlendedB);
channelsBlended.push_back(imBlendedG);
channelsBlended.push_back(imBlendedR);

// merge back to 3 channel image
cv::Mat merged;
cv::merge(channelsBlended,merged);

// convert to 8UC3
cv::Mat merged8U;
merged.convertTo(merged8U,CV_8UC3);

return merged8U;
}
и вспомогательную функцию:
cv::Mat border(cv::Mat mask)
{
cv::Mat gx;
cv::Mat gy;

cv::Sobel(mask,gx,CV_32F,1,0,3);
cv::Sobel(mask,gy,CV_32F,0,1,3);

cv::Mat border;
cv::magnitude(gx,gy,border);

return border > 100;
}
С результатом:
edit: забыли функцию ;) редактировать: теперь, сохраняя оригинальный фон
сначала создайте изображение маски из входного изображения, это можно сделать, удерживая исходное изображение и выполняя bitwise_and между ними.
Теперь скопируйте результат addweighted на новый коврик, используя маску выше.
В приведенном ниже коде я не использовал warpPerspective вместо этого я использовал ROI на обоих изображениях для выравнивания правильно.
Mat left=imread("left.jpg");
Mat front=imread("front.jpg");
int x=30, y=10, w=240, h=200, offset_x=20, offset_y=6;
Mat leftROI=left(Rect(x,y,w,h));
Mat frontROI=front(Rect(x-offset_x,y+offset_y,w,h));

//create mask
Mat gray1,thr1;
cvtColor(leftROI,gray1,CV_BGR2GRAY);
threshold( gray1, thr1,190, 255,CV_THRESH_BINARY_INV );
Mat gray2,thr2;
cvtColor(frontROI,gray2,CV_BGR2GRAY);
threshold( gray2, thr2,190, 255,CV_THRESH_BINARY_INV );
Mat mask;
bitwise_and(thr1,thr2,mask);

//perform add weighted and copy using mask
Mat add;
double alpha=.5;
double beta=.5;
addWeighted(frontROI,alpha,leftROI,beta,0.0,add,-1);
Mat dst(add.rows,add.cols,add.type(),Scalar::all(255));
add.copyTo(dst,mask);
imshow("dst",dst);
Ok. вот новая попытка, которая может работать только для вашей конкретной задачи, чтобы смешать ровно 3 изображения этих лиц, спереди, слева, справа.
Я использую эти материалы:
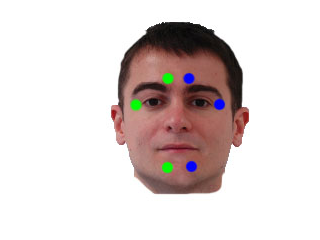
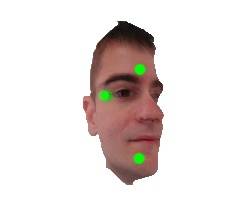
фронт (i1):
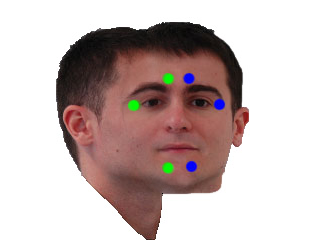
слева (i2):
справа (i3):

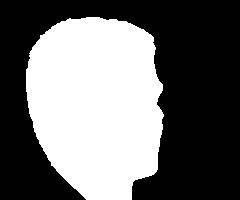
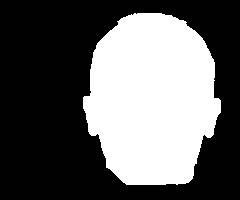
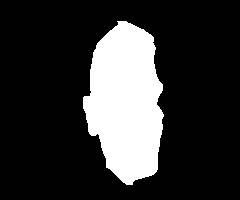
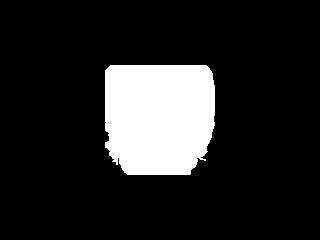
передняя маска (m1): (необязательно):
проблема с этими изображениями заключается в том, что переднее изображение только покрывает небольшую часть, в то время как левая и правая перекрывают все переднее изображение, что приводит к плохому смешиванию в моем другом решении. Кроме того, выравнивание изображений не так велико (в основном из-за эффектов перспективы), поэтому могут возникать артефакты смешивания.
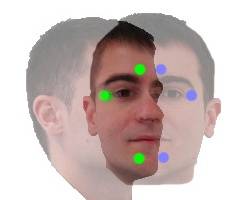
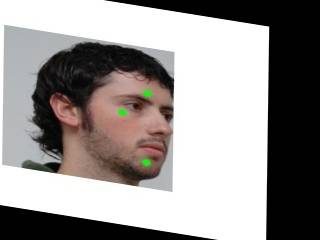
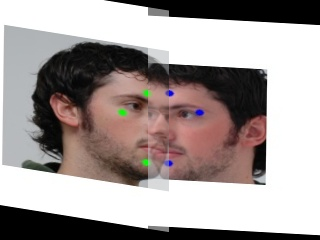
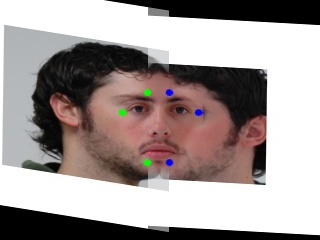
теперь идея этого нового метода заключается в том, что вы определенно хотите сохранить части переднего изображения, которые лежат внутри области, охватываемой вашими цветными "точками маркера", они не должны смешиваться. Чем дальше ты уходишь ... из этой области маркера следует использовать больше информации из левого и правого изображений, поэтому мы создаем маску с Альфа-значениями, которая линейно понижается от 1 (внутри области маркера) до 0 (на некотором определенном расстоянии от области маркера).
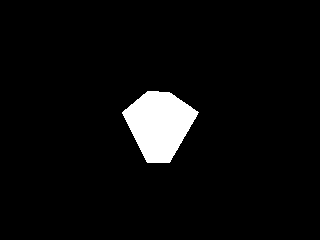
так, в области натянутого на маркеры это:
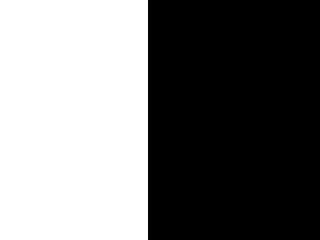
поскольку мы знаем, что левое изображение в основном используется в области слева от левого треугольника маркера, можно создать маски для левого и правого изображения, которые используются для поиска области, которая должна быть дополнительно покрыта передним изображением:
слева:
правильно:
передняя область маркера и все, что не находится в левой и не в правой маске:

это может быть замаскировано дополнительным входом передней маски, это лучше, потому что этот пример переднего изображения не покрывает все изображение, но, к сожалению, только часть образа.
теперь это маска смешивания с линейным уменьшением Альфа-значения, пока расстояние до маски не 10 или более пикселей:
теперь мы сначала создаем изображение, охватывающее только левое и правое изображение, копируя большинство незамкнутых частей, но смешиваем части, открытые левыми / правыми масками с 0.5*left + 0.5*right
blendLR:
наконец мы смешиваем front образ в том blendLR по compution:
blended = alpha*front + (1-alpha)*blendLR
некоторые улучшения могут включать в себя калюкуляцию maxDist значение из некоторой более высокой информации (например, размер перекрытия или размер от треугольников маркера до границы грани).
другим улучшением было бы не вычислять 0.5*left + 0.5*right но чтобы сделать некоторое Альфа-смешивание здесь тоже, принимая больше информации из левого изображения дальше влево мы находимся в промежутке. Этот уменьшит швы в середине изображения (сверху и снизу передней части изображения).
// idea: keep all the pixels from front image that are inside your 6 points area always unblended:
cv::Mat blendFrontAlpha(cv::Mat front, cv::Mat left, cv::Mat right, std::vector<cv::Point> sixPoints, cv::Mat frontForeground = cv::Mat())
{
// define some maximum distance. No information of the front image is used if it's further away than that maxDist.
// if you have some real masks, you can easily set the maxDist according to the dimension of that mask - dimension of the 6-point-mask
float maxDist = 10;
// to use the cv function to draw contours we must order it like this:
std::vector<std::vector<cv::Point> > contours;
contours.push_back(sixPoints);
// create the mask
cv::Mat frontMask = cv::Mat::zeros(front.rows, front.cols, CV_8UC1);
// draw those 6 points connected as a filled contour
cv::drawContours(frontMask,contours,0,cv::Scalar(255),-1);
// add "lines": everything left from the points 3-4-5 might be used from left image, everything from the points 0-1-2 might be used from the right image:
cv::Mat leftMask = cv::Mat::zeros(front.rows, front.cols, CV_8UC1);
{
cv::Point2f center = cv::Point2f(sixPoints[3].x, sixPoints[3].y);
float steigung = ((float)sixPoints[5].y - (float)sixPoints[3].y)/((float)sixPoints[5].x - (float)sixPoints[3].x);
if(sixPoints[5].x - sixPoints[3].x == 0) steigung = 2*front.rows;
float n = center.y - steigung*center.x;
cv::Point2f top = cv::Point2f( (0-n)/steigung , 0);
cv::Point2f bottom = cv::Point2f( (front.rows-1-n)/steigung , front.rows-1);
// now create the contour of the left image:
std::vector<cv::Point> leftMaskContour;
leftMaskContour.push_back(top);
leftMaskContour.push_back(bottom);
leftMaskContour.push_back(cv::Point(0,front.rows-1));
leftMaskContour.push_back(cv::Point(0,0));
std::vector<std::vector<cv::Point> > leftMaskContours;
leftMaskContours.push_back(leftMaskContour);
cv::drawContours(leftMask,leftMaskContours,0,cv::Scalar(255),-1);
cv::imshow("leftMask", leftMask);
cv::imwrite("x_leftMask.png", leftMask);
}
// add "lines": everything left from the points 3-4-5 might be used from left image, everything from the points 0-1-2 might be used from the right image:
cv::Mat rightMask = cv::Mat::zeros(front.rows, front.cols, CV_8UC1);
{
// add "lines": everything left from the points 3-4-5 might be used from left image, everything from the points 0-1-2 might be used from the right image:
cv::Point2f center = cv::Point2f(sixPoints[2].x, sixPoints[2].y);
float steigung = ((float)sixPoints[0].y - (float)sixPoints[2].y)/((float)sixPoints[0].x - (float)sixPoints[2].x);
if(sixPoints[0].x - sixPoints[2].x == 0) steigung = 2*front.rows;
float n = center.y - steigung*center.x;
cv::Point2f top = cv::Point2f( (0-n)/steigung , 0);
cv::Point2f bottom = cv::Point2f( (front.rows-1-n)/steigung , front.rows-1);
std::cout << top << " - " << bottom << std::endl;
// now create the contour of the left image:
std::vector<cv::Point> rightMaskContour;
rightMaskContour.push_back(cv::Point(front.cols-1,0));
rightMaskContour.push_back(cv::Point(front.cols-1,front.rows-1));
rightMaskContour.push_back(bottom);
rightMaskContour.push_back(top);
std::vector<std::vector<cv::Point> > rightMaskContours;
rightMaskContours.push_back(rightMaskContour);
cv::drawContours(rightMask,rightMaskContours,0,cv::Scalar(255),-1);
cv::imshow("rightMask", rightMask);
cv::imwrite("x_rightMask.png", rightMask);
}
// add everything that's not in the side masks to the front mask:
cv::Mat additionalFrontMask = (255-leftMask) & (255-rightMask);
// if we know more about the front face, use that information:
cv::imwrite("x_frontMaskIncreased1.png", frontMask + additionalFrontMask);
if(frontForeground.cols)
{
// since the blending mask is blended for maxDist distance, we have to erode this mask here.
cv::Mat tmp;
cv::erode(frontForeground,tmp,cv::Mat(),cv::Point(),maxDist);
// idea is to only use the additional front mask in those areas where the front image contains of face and not those background parts.
additionalFrontMask = additionalFrontMask & tmp;
}
frontMask = frontMask + additionalFrontMask;
cv::imwrite("x_frontMaskIncreased2.png", frontMask);
//todo: add lines
cv::imshow("frontMask", frontMask);
// for visualization only:
cv::Mat frontMasked;
front.copyTo(frontMasked, frontMask);
cv::imshow("frontMasked", frontMasked);
cv::imwrite("x_frontMasked.png", frontMasked);
// compute inverse of mask to take it as input for distance transform:
cv::Mat inverseFrontMask = 255-frontMask;
// compute the distance to the mask, the further away from the mask, the less information from the front image should be used:
cv::Mat dist;
cv::distanceTransform(inverseFrontMask,dist,CV_DIST_L2, 3);
// scale wanted values between 0 and 1:
dist /= maxDist;
// remove all values > 1; those values are further away than maxDist pixel from the 6-point-mask
dist.setTo(cv::Scalar(1.0f), dist>1.0f);
// now invert the values so that they are == 1 inside the 6-point-area and go to 0 outside:
dist = 1.0f-dist;
cv::Mat alphaValues = dist;
//cv::Mat alphaNonZero = alphaValues > 0;
// now alphaValues contains your general blendingMask.
// but to use it on colored images, we need to duplicate the channels:
std::vector<cv::Mat> singleChannels;
singleChannels.push_back(alphaValues);
singleChannels.push_back(alphaValues);
singleChannels.push_back(alphaValues);
// merge all the channels:
cv::merge(singleChannels, alphaValues);
cv::imshow("alpha mask",alphaValues);
cv::imwrite("x_alpha_mask.png", alphaValues*255);
// convert all input mats to floating point mats:
front.convertTo(front,CV_32FC3);
left.convertTo(left,CV_32FC3);
right.convertTo(right,CV_32FC3);
cv::Mat result;
// first: blend left and right both with 0.5 to the result, this gives the correct results for the intersection of left and right equally weighted.
// TODO: these values could be blended from left to right, giving some finer results
cv::addWeighted(left,0.5,right,0.5,0, result);
// now copy all the elements that are included in only one of the masks (not blended, just 100% information)
left.copyTo(result,leftMask & (255-rightMask));
right.copyTo(result,rightMask & (255-leftMask));
cv::imshow("left+right", result/255.0f);
cv::imwrite("x_left_right.png", result);
// now blend the front image with it's alpha blending mask:
cv::Mat result2 = front.mul(alphaValues) + result.mul(cv::Scalar(1.0f,1.0f,1.0f)-alphaValues);
cv::imwrite("x_front_blend.png", front.mul(alphaValues));
cv::imshow("inv", cv::Scalar(1.0f,1.0f,1.0f)-alphaValues);
cv::imshow("f a", front.mul(alphaValues)/255.0f);
cv::imshow("f r", (result.mul(cv::Scalar(1.0f,1.0f,1.0f)-alphaValues))/255.0f);
result2.convertTo(result2, CV_8UC3);
return result2;
}
int main()
{
// front image
cv::Mat i1 = cv::imread("blending/new/front.jpg");
// left image
cv::Mat i2 = cv::imread("blending/new/left.jpg");
// right image
cv::Mat i3 = cv::imread("blending/new/right.jpg");
// optional: mask of front image
cv::Mat m1 = cv::imread("blending/new/mask_front.png",CV_LOAD_IMAGE_GRAYSCALE);
cv::imwrite("x_M1.png", m1);
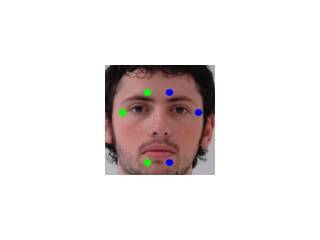
// these are the marker points you detect in the front image.
// the order is important. the first three pushed points are the right points (left part of the face) in order from top to bottom
// the second three points are the ones from the left image half, in order from bottom to top
// check coordinates for those input images to understand the ordering!
std::vector<cv::Point> frontArea;
frontArea.push_back(cv::Point(169,92));
frontArea.push_back(cv::Point(198,112));
frontArea.push_back(cv::Point(169,162));
frontArea.push_back(cv::Point(147,162));
frontArea.push_back(cv::Point(122,112));
frontArea.push_back(cv::Point(147,91));
// first parameter is the front image, then left (right face half), then right (left half of face), then the image polygon and optional the front image mask (which contains all facial parts of the front image)
cv::Mat result = blendFrontAlpha(i1,i2,i3, frontArea, m1);
cv::imshow("RESULT", result);
cv::imwrite("x_Result.png", result);
cv::waitKey(-1);
return 0;
}
во избежание делать стороны прозрачным вне их пересечения,вы не можете использовать один alpha значение для всего изображения.
например, вам нужно использовать alpha=0.5 на пересечении img[0] и img[1], alpha=1 в регионе, где img[1]=0 и alpha=0 в регионе, где img[0]=0.
этот пример является простым подходом, но он не будет полностью удалять швы. Если вы хотите этого, вы должны адаптироваться alpha больше разумно основанный на содержании изображения. Вы можете взглянуть на многочисленные исследовательские статьи по этой теме, но это не тривиальная задача: