"UIAlertView" был устаревшим в iOS 9.0. Использовать UIAlertController с preferredStyle из UIAlertControllerStyleAlert вместо
Я вижу больше ответов, но ничего не помогло.Вот моя старая тревога и действие для этого
override func viewWillAppear(animated: Bool) {
    if Reachability.isConnectedToNetwork() == true {
        print("internet connection ok")
    } else
    {
        print("internet not ok")
        let alertView: UIAlertView = UIAlertView(title: "Alert ", message: "connect to internet", delegate: self, cancelButtonTitle: "settings", otherButtonTitles: "cancel")
        alertView.show()
        return
    }
}

func alertView(alertView: UIAlertView, clickedButtonAtIndex buttonIndex: Int)
{
    if buttonIndex == 0 {
        //This will open ios devices wifi settings
        UIApplication.sharedApplication().openURL(NSURL(string: "prefs:root")!)
    }
    else if buttonIndex == 1
    {
        //TODO for cancel
        exit(0)
    }
}
в этом я получаю предупреждение:
'UIAlertView был устаревшим в iOS 9.0. Использовать UIAlertController с preferredStyle из UIAlertControllerStyleAlert вместо
пробовал :
let alert = UIAlertController(title: "Alert", message: "My Alert for test", preferredStyle: UIAlertControllerStyle.Alert)
alert.addAction(UIAlertAction(title: "Ok", style: UIAlertActionStyle.Default, handler: nil))
alert.addAction(UIAlertAction(title: "Cancel", style: UIAlertActionStyle.Default, handler: {    (action:UIAlertAction!) in
        print("you have pressed the Cancel button")
    }))
self.presentViewController(alert, animated: true, completion: nil)
но чтобы добавить две кнопки и добавить путь индекса метода нажатия кнопки, свяжите мой старый код, я не могу этого сделать. Ничего не происходит с моей кнопкой uialert,
пожалуйста, помогите мне, как я могу удалить эти предупреждения и перекодировать мой Uialert с помощью двух кнопок.
Я новичок в swift.Ваша помощь будет полезна.Спасибо!
8 ответов
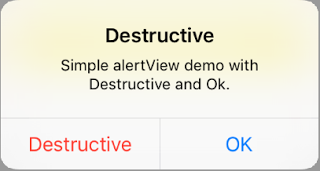
см. этот код деструктивных и OK кнопки в UIAlertController:
let alertController = UIAlertController(title: "Destructive", message: "Simple alertView demo with Destructive and Ok.", preferredStyle: UIAlertControllerStyle.alert) //Replace UIAlertControllerStyle.Alert by UIAlertControllerStyle.alert
let DestructiveAction = UIAlertAction(title: "Destructive", style: UIAlertActionStyle.Destructive) {
    (result : UIAlertAction) -> Void in
    print("Destructive")
}

// Replace UIAlertActionStyle.Default by UIAlertActionStyle.default
let okAction = UIAlertAction(title: "OK", style: UIAlertActionStyle.default) {
    (result : UIAlertAction) -> Void in
    print("OK")
}

alertController.addAction(DestructiveAction)
alertController.addAction(okAction)
self.presentViewController(alertController, animated: true, completion: nil)
Swift 3:
let alertController = UIAlertController(title: "Destructive", message: "Simple alertView demo with Destructive and Ok.", preferredStyle: UIAlertControllerStyle.alert) //Replace UIAlertControllerStyle.Alert by UIAlertControllerStyle.alert

let DestructiveAction = UIAlertAction(title: "Destructive", style: UIAlertActionStyle.destructive) {
                        (result : UIAlertAction) -> Void in
    print("Destructive")
}

                    // Replace UIAlertActionStyle.Default by UIAlertActionStyle.default

let okAction = UIAlertAction(title: "OK", style: UIAlertActionStyle.default) {
                        (result : UIAlertAction) -> Void in
    print("OK")
}

alertController.addAction(DestructiveAction)
alertController.addAction(okAction)
self.present(alertController, animated: true, completion: nil)
см. предупреждение с помощью кнопки Destructive и OK:
на Swift 3 можно написать так:
let alertController = UIAlertController(title: "Title", message: "This is my text", preferredStyle: UIAlertControllerStyle.alert)

let okAction = UIAlertAction(title: "OK", style: UIAlertActionStyle.default)
{
     (result : UIAlertAction) -> Void in
      print("You pressed OK")
}
alertController.addAction(okAction)
self.present(alertController, animated: true, completion: nil)
для основного предупреждающего сообщения Мне нравится использовать расширение на UIViewController:
extension UIViewController {
func alertMessageOk(title: String, message: String) {
    let alert = UIAlertController(title: title, message: message, preferredStyle: UIAlertControllerStyle.alert)
    let action = UIAlertAction(title: "Ok", style: .default, handler: nil)
    alert.addAction(action)
    present(alert, animated: true, completion: nil)
   }
}
использование:
self.alertMessageOk(title: "Test Title", message: "Test message")
Swift 3
    // Create message
     let alertController = UIAlertController(title: "Title",
                                           message: "Message",
                                    preferredStyle: .actionSheet)

    // Clear Action
    let clearAction = UIAlertAction(title: "Clear",
                                    style: .destructive,
                                  handler: { (action:UIAlertAction!) in
                         print ("clear")
    })
    alertController.addAction(clearAction)

    // Cancel
    let cancelAction = UIAlertAction(title: "Cancel",
                                     style: .cancel,
                                   handler: { (action:UIAlertAction!) in
                                print ("Cancel")
    })
    alertController.addAction(cancelAction)

    // Present Alert
    self.present(alertController,
                 animated: true,
                 completion:nil)
  UIAlertController *AC = UIAlertController.alertControllerWithTitle("Title",message:"Message",preferredStyle:UIAlertControllerStyleAlert)

  UIAlertAction *ActionOne = [UIAlertAction actionWithTitle:"ActionOne" style:UIAlertActionStyleDefault handler:^(UIAlertAction * _Nonnull action) { NSLog("ActionOne")
} ]

  UIAlertAction *ActionTwo = [UIAlertAction actionWithTitle:"ActionTwo" style:UIAlertActionStyleDefault handler:^(UIAlertAction * _Nonnull action) { NSLog("ActionTwo")
} ]
AC.addAction(ActionOne)
AC.addAction(ActionTwo)
self.presentViewController(AC,animated:true,completion:nil)
попробуйте этот код. Ex
 let actionSheetController: UIAlertController = UIAlertController(title: "Are you sure?", message: "", preferredStyle: .Alert)
 let cancelAction: UIAlertAction = UIAlertAction(title: "NO", style: .Cancel) { action -> Void in
                 //Do your task
  }
  actionSheetController.addAction(cancelAction)
  let nextAction: UIAlertAction = UIAlertAction(title: "YES", style: .Default) { action -> Void in
           //Do your task             //NSUserDefaults.standardUserDefaults().removePersistentDomainForName(NSBundle.mainBundle().bundleIdentifier!)
      //                  NSUserDefaults.standardUserDefaults().synchronize()
 }
 actionSheetController.addAction(nextAction)
 self.presentViewController(actionSheetController, animated: true, completion: nil)
Я получил этот ответ по этой ссылке, я думаю, что это полезно для вас
как добавить действие к кнопке UIAlertView с помощью Swift iOS
    var alertController = UIAlertController(title: "Title", message: "Message", preferredStyle: .Alert)

// Create the actions
var okAction = UIAlertAction(title: "OK", style: UIAlertActionStyle.Default) {
    UIAlertAction in
    NSLog("OK Pressed")
}
var cancelAction = UIAlertAction(title: "Cancel", style: UIAlertActionStyle.Cancel) {
    UIAlertAction in
    NSLog("Cancel Pressed")
}

// Add the actions
alertController.addAction(okAction)
alertController.addAction(cancelAction)

// Present the controller
self.presentViewController(alertController, animated: true, completion: nil)
этот код поможет
let alertController = UIAlertController(title: "Default AlertController", message: "A standard alert", preferredStyle: .Alert)

let cancelAction = UIAlertAction(title: "Cancel", style: .Cancel)
{
   (action:UIAlertAction!) in
   print("you have pressed the Cancel button");
}
alertController.addAction(cancelAction)

let OKAction = UIAlertAction(title: "OK", style: .Default)
{
  (action:UIAlertAction!) in
                print("you have pressed OK button");
}
alertController.addAction(OKAction)

self.presentViewController(alertController, animated: true, completion:nil)

