Как выровнять по нижней части экрана?
вот мой код макета;
<?xml version="1.0" encoding="utf-8"?>
<LinearLayout xmlns:android="http://schemas.android.com/apk/res/android"
    android:orientation="vertical"
    android:layout_width="fill_parent"
    android:layout_height="fill_parent">

    <TextView android:text="@string/welcome"
        android:id="@+id/TextView"
        android:layout_width="fill_parent"
        android:layout_height="wrap_content">
    </TextView>

    <LinearLayout android:id="@+id/LinearLayout"
        android:orientation="horizontal"
        android:layout_width="wrap_content"
        android:layout_height="wrap_content"
        android:gravity="bottom">

            <EditText android:id="@+id/EditText"
                android:layout_width="fill_parent"
                android:layout_height="wrap_content">
            </EditText>

            <Button android:text="@string/label_submit_button"
                android:id="@+id/Button"
                android:layout_width="wrap_content"
                android:layout_height="wrap_content">
            </Button>

    </LinearLayout>

</LinearLayout>
то, что это выглядит слева, и то, что я хочу, чтобы это выглядело справа.

очевидный ответ-установить TextView в fill_parent по высоте, но это не вызывает места для кнопки или поля ввода. По сути, проблема в том, что я хочу, чтобы кнопка отправки и текстовая запись были фиксированной высотой внизу, а текстовый вид заполнял остальную часть пространства, аналогично в горизонтальный линейный макет я хочу, чтобы кнопка отправки обернула его содержимое, а текстовая запись заполнила остальную часть пространства.
Если первому элементу в линейном макете говорят fill_parent, он делает именно это, не оставляя места для других элементов, как получить элемент, который является первым в линейном макете, чтобы заполнить все пространство, кроме минимума, требуемого остальными элементами в макете?
EDIT:
относительные макеты действительно были ответом-спасибо ты!
    <?xml version="1.0" encoding="utf-8"?>
    <RelativeLayout
    xmlns:android="http://schemas.android.com/apk/res/android"
    android:layout_width="fill_parent"
    android:layout_height="fill_parent">

    <TextView
        android:text="@string/welcome"
        android:id="@+id/TextView"
        android:layout_width="fill_parent"
        android:layout_height="wrap_content"
        android:layout_alignParentTop="true">
    </TextView>

    <RelativeLayout
        android:id="@+id/InnerRelativeLayout"
        android:layout_width="wrap_content"
        android:layout_height="wrap_content"
        android:layout_alignParentBottom="true" >

        <Button
            android:text="@string/label_submit_button"
            android:id="@+id/Button"
            android:layout_alignParentRight="true"
            android:layout_width="wrap_content"
            android:layout_height="wrap_content">
        </Button>

        <EditText
            android:id="@+id/EditText"
            android:layout_width="fill_parent"
            android:layout_toLeftOf="@id/Button"
            android:layout_height="wrap_content">
        </EditText>

    </RelativeLayout>

</RelativeLayout>
18 ответов
Я думаю, вы должны попробовать относительная разметка.
Если у вас есть относительный макет, который заполняет весь экран, вы должны иметь возможность использовать android:layout_alignParentBottom для перемещения кнопки в нижней части экрана.
Если ваши представления внизу не отображаются в относительном макете, то, возможно, макет выше занимает все пространство. В этом случае вы можете поместить представление, которое должно быть внизу, сначала в файл макета и расположить остальную часть макета выше виды с android:layout_above. Это позволит нижнему виду занять столько места, сколько ему нужно, а остальная часть макета может заполнить всю остальную часть экрана.
на ScrollView это не работает, так как RelativeLayout затем будет перекрывать все, что находится в ScrollView в нижней части страницы.
я исправил его, используя динамическое растяжение FrameLayout :
<ScrollView
    xmlns:android="http://schemas.android.com/apk/res/android"
    android:layout_height="match_parent"
    android:layout_width="match_parent"
    android:fillViewport="true">
    <LinearLayout
        android:id="@+id/LinearLayout01"
        android:layout_width="match_parent"
        android:layout_height="match_parent"
        xmlns:android="http://schemas.android.com/apk/res/android"
        android:orientation="vertical">

                <!-- content goes here -->

                <!-- stretching frame layout, using layout_weight -->
        <FrameLayout
            android:layout_width="match_parent"
            android:layout_height="0dp"
            android:layout_weight="1">
        </FrameLayout>

                <!-- content fixated to the bottom of the screen -->
        <LinearLayout
            android:layout_width="match_parent"
            android:layout_height="wrap_content"
            android:orientation="horizontal">
                                   <!-- your bottom content -->
        </LinearLayout>
    </LinearLayout>
</ScrollView>
вы можете сохранить свой начальный линейный макет, вложив относительный макет в линейный макет:
<LinearLayout
    android:orientation="vertical"
    android:layout_width="fill_parent"
    android:layout_height="fill_parent">

    <TextView android:text="welcome"
        android:id="@+id/TextView"
        android:layout_width="fill_parent"
        android:layout_height="wrap_content">
    </TextView>

    <RelativeLayout
        android:layout_width="match_parent"
        android:layout_height="match_parent">
        <Button android:text="submit"
            android:id="@+id/Button"
            android:layout_width="wrap_content"
            android:layout_height="wrap_content"
            android:layout_alignParentBottom="true"
            android:layout_alignParentRight="true">
        </Button>
        <EditText android:id="@+id/EditText"
            android:layout_width="match_parent"
            android:layout_height="wrap_content"
            android:layout_toLeftOf="@id/Button"
            android:layout_alignParentBottom="true">
        </EditText>
    </RelativeLayout>
</LinearLayout>
ответ выше (Янушем) довольно правильный, но я лично не чувствую себя на 100% комфортно с RelativeLayouts, поэтому я предпочитаю вводить "наполнитель", пустой TextView, например:
<!-- filler -->
<TextView android:layout_height="0dip"
          android:layout_width="fill_parent"
          android:layout_weight="1" />
перед элементом, который должен находиться в нижней части экрана.
вы можете сделать это с помощью LinearLayout или ScrollView. Иногда проще реализовать тогда RelativeLayout. Единственное, что вам нужно сделать, это добавить следующий вид до виды, которые вы хотите выровнять в нижней части экрана:
<View
        android:layout_width="wrap_content"
        android:layout_height="0dp"
        android:layout_weight="1" />
это создает пустое представление, заполняя пустое пространство и нажимая следующие представления в нижней части экрана.
Это также работает.
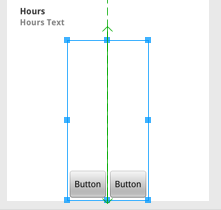
<LinearLayout
    android:id="@+id/linearLayout4"
    android:layout_width="wrap_content"
    android:layout_height="fill_parent"
    android:layout_below="@+id/linearLayout3"
    android:layout_centerHorizontal="true"
    android:orientation="horizontal"
    android:gravity="bottom"
    android:layout_alignParentBottom="true"
    android:layout_marginTop="20dp"
>

    <Button
        android:id="@+id/button1"
        android:layout_width="wrap_content"
        android:layout_height="wrap_content"
        android:text="Button"

    />

    <Button
        android:id="@+id/button2"
        android:layout_width="wrap_content"
        android:layout_height="wrap_content"
        android:text="Button"


    />

</LinearLayout>
следуя элегантному решению Timores, я обнаружил, что следующее создает вертикальную заливку в вертикальном LinearLayout и горизонтальную заливку в горизонтальном LinearLayout:
<Space
    android:layout_width="match_parent"
    android:layout_height="match_parent"
    android:layout_weight="1" />
вам даже не нужно гнездиться второй relative макет внутри первого. Просто используйте android:layout_alignParentBottom="true" на и полей EditText.
Если вы не хотите вносить много изменений, то вы можете просто поставить:
android:layout_weight="1"
для TextView, имеющего ID как @+id/TextView Я.е
<TextView android:text="@string/welcome"
    android:id="@+id/TextView"
    android:layout_width="fill_parent"
    android:layout_height="wrap_content"
    android:layout_weight="1">
</TextView>
1.Использовать ConstraintLayout в вашем корневом макете
и set app:layout_constraintBottom_toBottomOf="parent", чтобы макет в нижней части экрана
<LinearLayout
    android:id="@+id/LinearLayout"
    android:layout_width="match_parent"
    android:layout_height="wrap_content"
    android:orientation="horizontal"
    app:layout_constraintBottom_toBottomOf="parent">
</LinearLayout>
2.Использовать FrameLayout в вашем корневом макете
просто набор android:layout_gravity="bottom" в формате
<LinearLayout
    android:id="@+id/LinearLayout"
    android:layout_width="match_parent"
    android:layout_height="wrap_content"
    android:layout_gravity="bottom"
    android:orientation="horizontal">
</LinearLayout>
3.Использовать LinearLayout в корневом макете (android:orientation="vertical")
(1)установить макет android:layout_weight="1" на верхней части вашего Макет
<TextView
    android:id="@+id/TextView"
    android:layout_width="match_parent"
    android:layout_height="0dp"
    android:layout_weight="1"
    android:text="welcome" />
(2)Установите ребенка LinearLayout на android:layout_width="match_parent" android:layout_height="match_parent" android:gravity="bottom"
главный атрибут ndroid:gravity="bottom", пусть дочерний вид в нижней части макета .
<LinearLayout
    android:id="@+id/LinearLayout"
    android:layout_width="match_parent"
    android:layout_height="match_parent"
    android:gravity="bottom"
    android:orientation="horizontal">
</LinearLayout>
4.Использовать RelativeLayout в корневом макете
и set android:layout_alignParentBottom="true", чтобы макет в нижней части экрана
<LinearLayout
    android:id="@+id/LinearLayout"
    android:layout_width="match_parent"
    android:layout_height="wrap_content"
    android:layout_alignParentBottom="true"
    android:orientation="horizontal">
</LinearLayout>
выход

создание верхнего и нижнего колонтитулов, вот пример
[ макет XML ]
<RelativeLayout
    xmlns:android="http://schemas.android.com/apk/res/android"
    xmlns:tools="http://schemas.android.com/tools"
    android:layout_width="fill_parent"
    android:layout_height="fill_parent"
    android:background="@color/backgroundcolor"
    tools:context=".MainActivity">

    <RelativeLayout
        android:layout_width="fill_parent"
        android:layout_height="40dp"
        android:background="#FF0000">
    </RelativeLayout>

    <RelativeLayout
        android:layout_width="fill_parent"
        android:layout_height="40dp"
        android:layout_alignParentBottom="true"
        android:background="#FFFF00">
    </RelativeLayout>

</RelativeLayout>
[ скриншот ]
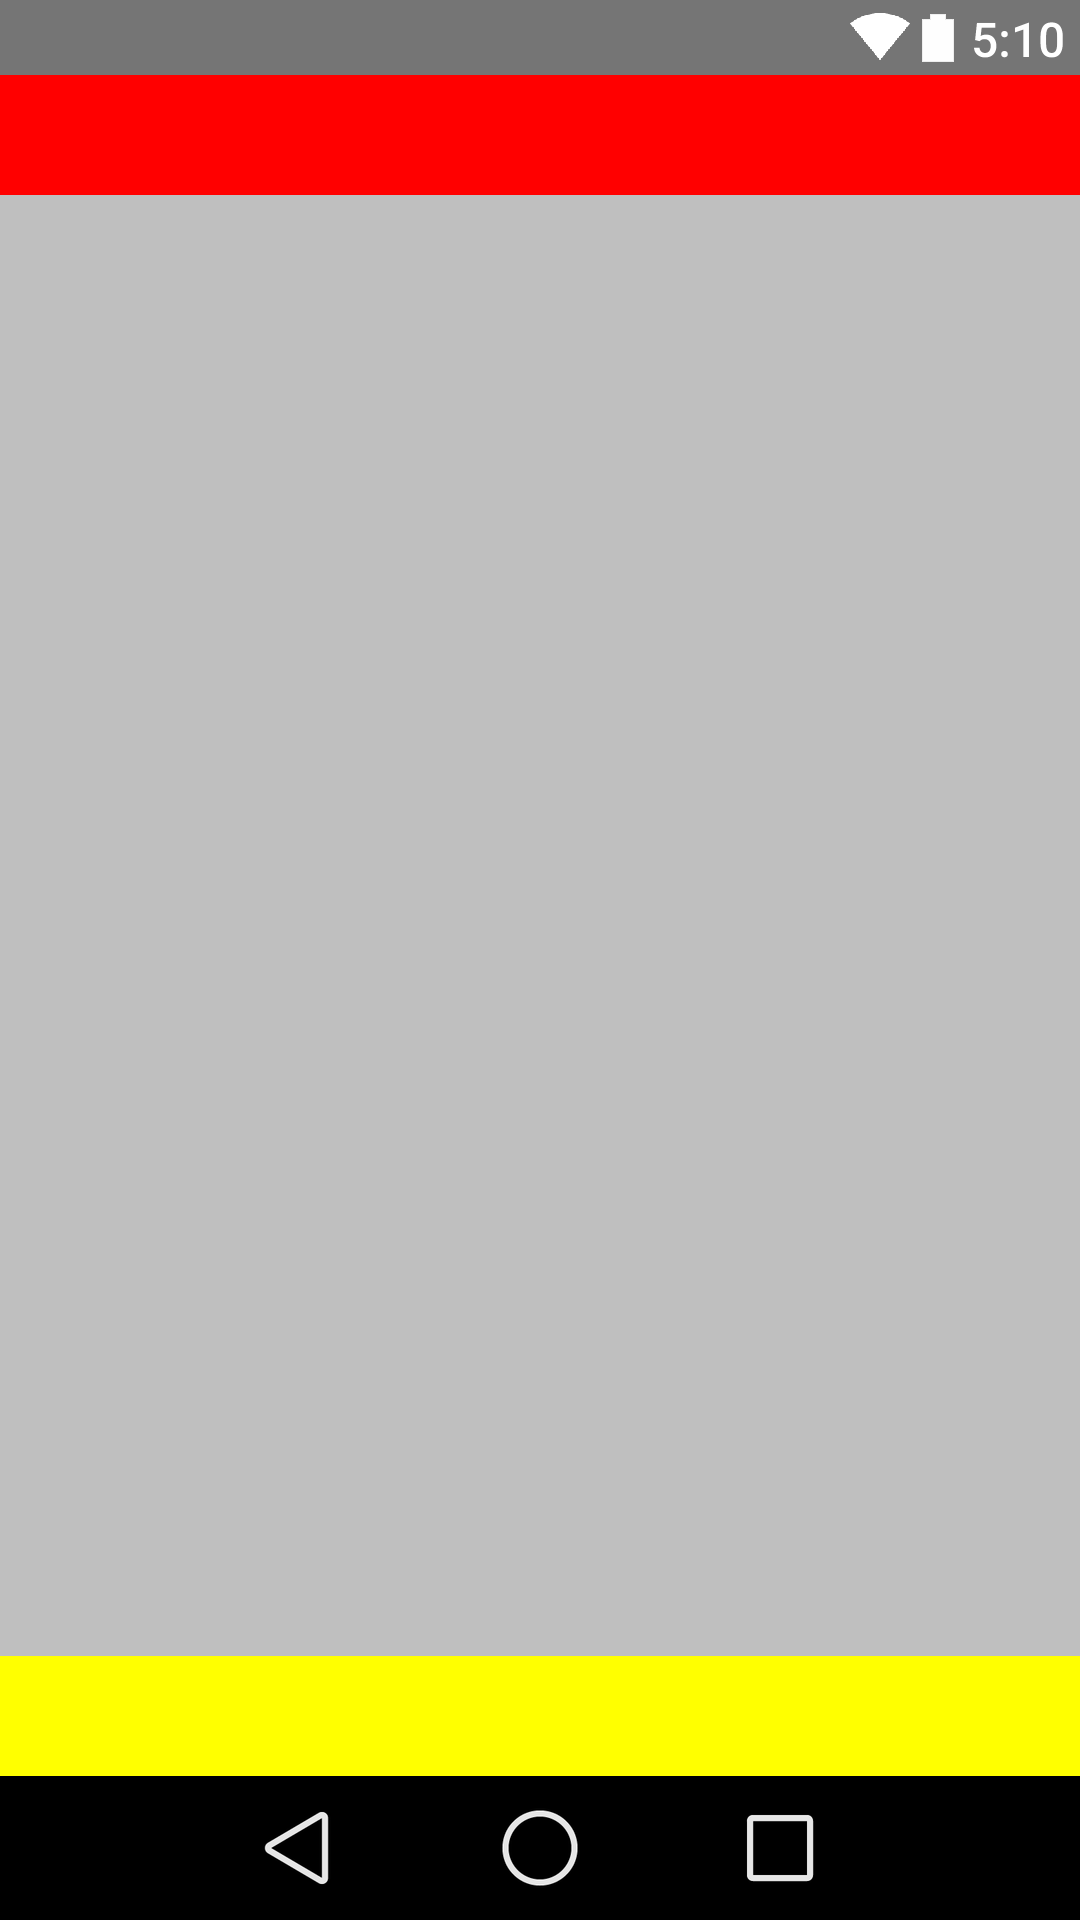
надеюсь, это полезно. Спасибо!!
используйте ниже кнопку выравнивания кода, чтобы bottem его работа
    <?xml version="1.0" encoding="utf-8"?>
<LinearLayout xmlns:android="http://schemas.android.com/apk/res/android"
    android:layout_width="match_parent"
    android:layout_height="match_parent"
    android:orientation="vertical" >

    <Button
        android:id="@+id/btn_back"
        android:layout_width="100dp"
        android:layout_height="80dp"
        android:text="Back" />

    <TextView
        android:layout_width="match_parent"
        android:layout_height="0dp"
        android:layout_weight="0.97"
        android:gravity="center"
        android:text="Payment Page" />

    <LinearLayout
        android:layout_width="match_parent"
        android:layout_height="wrap_content" >

        <EditText
            android:layout_width="wrap_content"
            android:layout_height="wrap_content"
            android:layout_weight="1"/>

        <Button
            android:layout_width="wrap_content"
            android:layout_height="wrap_content"
            android:text="Submit"/>
    </LinearLayout>

</LinearLayout>
для такого случая всегда используйте RelativeLayouts. LinearLayout не предназначен для такого использования.
<?xml version="1.0" encoding="utf-8"?>
<RelativeLayout
xmlns:android="http://schemas.android.com/apk/res/android"
          android:id="@+id/db1_root"
          android:layout_width="match_parent"
          android:layout_height="match_parent"
          android:orientation="vertical" >

<LinearLayout
    android:layout_width="match_parent"
    android:layout_height="match_parent"
    android:orientation="vertical">

    <!-- Place your layout here -->

</LinearLayout>

<LinearLayout
    android:layout_width="match_parent"
    android:layout_height="wrap_content"
    android:layout_alignParentBottom="true"
    android:layout_gravity="bottom"
    android:orientation="horizontal"
    android:paddingLeft="20dp"
    android:paddingRight="20dp" >

    <Button
        android:id="@+id/setup_macroSavebtn"
        android:layout_width="0dp"
        android:layout_height="wrap_content"
        android:layout_weight="1"
        android:text="Save" />

    <Button
        android:id="@+id/setup_macroCancelbtn"
        android:layout_width="0dp"
        android:layout_height="wrap_content"
        android:layout_weight="1"
        android:text="Cancel" />

    </LinearLayout>

</RelativeLayout>
использовать android:layout_alignParentBottom="true" в своем <RelativeLayout>.
Это, безусловно, поможет.
в случае, если у вас есть иерархия такая:
<ScrollView>
  |-- <RelativeLayout>
    |-- <LinearLayout>
во-первых, применить android:fillViewport="true" до ScrollView и затем применить android:layout_alignParentBottom="true" до LinearLayout.
это сработало для меня отлично.
<ScrollView
    android:layout_height="match_parent"
    android:layout_width="match_parent"
    android:scrollbars="none"
    android:fillViewport="true">
    <RelativeLayout
        android:layout_width="match_parent"
        android:layout_height="wrap_content">
        <LinearLayout
            android:orientation="horizontal"
            android:layout_width="match_parent"
            android:layout_height="wrap_content"
            android:gravity="center"
            android:id="@+id/linearLayoutHorizontal"
            android:layout_alignParentBottom="true">
        </LinearLayout>
    </RelativeLayout>
</ScrollView>
вы можете просто дать свой верхний дочерний вид (TextView @+код/поле TextView) атрибут:
android:layout_weight="1".
это заставит все остальные элементы под ним внизу.
Я использовал решение, опубликованное Янушем, но добавил дополнение к последнему виду, так как верхняя часть моего макета была ScrollView. ScrollView будет частично скрыт, поскольку он растет с содержимым. Использование android: paddingBottom на последнем представлении помогает показать все содержимое в ScrollView.
Это можно сделать и с линейной компоновкой Просто укажите Height = 0dp и weight = 1 для макета выше, а тот, который вы хотите внизу, просто напишите height = wrap content и No weight. Что он делает, так это предоставляет содержимое обертки для макета (тот, который содержит ваш текст редактирования и кнопку), а затем тот, который имеет вес, занимает остальную часть макета. Я обнаружил это случайно.