Как настроить макет при появлении мягкой клавиатуры
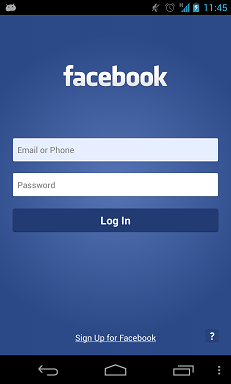
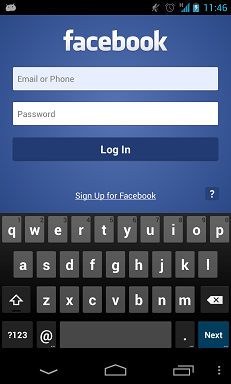
Я хотел бы настроить / изменить размер макета при активации мягкой клавиатуры, как показано ниже:
до и после:
нашел пару ресурсов в SO:
- как сохранить все поля и тексты видимыми, пока отображается мягкая клавиатура
- android мягкая клавиатура портит макет, когда появляется
- настроить макет для софт клавиатура включена
но вопросы и ответы довольно неоднозначны, вот вопрос с более четкой картиной того, что я хочу.
требования:
- он должен работать на телефоне с любыми размерами экрана.
- заметил, что поле / заполнение пространства в "FACEBOOK" и " зарегистрироваться Facebook " изменился до и после.
- нет прокрутки не участвует.
9 ответов
просто добавить
android:windowSoftInputMode="adjustResize"
в вашем AndroidManifest.xml, где вы объявляете это конкретное действие, и это изменит параметр изменения размера макета.
некоторый исходный код ниже для дизайна макета
<?xml version="1.0" encoding="utf-8"?>
<RelativeLayout xmlns:android="http://schemas.android.com/apk/res/android"
    android:layout_width="match_parent"
    android:layout_height="match_parent"
    android:orientation="vertical" >

    <TextView
        android:id="@+id/textView1"
        android:layout_width="wrap_content"
        android:layout_height="wrap_content"
        android:layout_centerHorizontal="true"
        android:layout_marginTop="20dp"
        android:text="FaceBook"
        android:textAppearance="?android:attr/textAppearanceLarge" />

    <EditText
        android:id="@+id/editText1"
        android:layout_width="match_parent"
        android:layout_height="wrap_content"
        android:layout_below="@+id/textView1"
        android:layout_marginTop="30dp"
        android:ems="10"
        android:hint="username" >

        <requestFocus />
    </EditText>

    <EditText
        android:id="@+id/editText2"
        android:layout_width="match_parent"
        android:layout_height="wrap_content"
        android:layout_below="@+id/editText1"
        android:layout_marginTop="20dp"
        android:ems="10"
        android:hint="password" />

    <Button
        android:id="@+id/button1"
        android:layout_width="match_parent"
        android:layout_height="wrap_content"
        android:layout_below="@+id/editText2"
        android:layout_centerHorizontal="true"
        android:layout_marginLeft="18dp"
        android:layout_marginTop="20dp"
        android:text="Log In" />

    <TextView
        android:id="@+id/textView2"
        android:layout_width="match_parent"
        android:layout_height="wrap_content"
        android:layout_alignParentBottom="true"
        android:layout_marginTop="17dp"
        android:gravity="center"
        android:text="Sign up for facebook"
        android:textAppearance="?android:attr/textAppearanceLarge" />

</RelativeLayout>
этот вопрос был задан несколько лет назад, и "Secret Andro Geni" имеет хорошее базовое объяснение, а "tir38" также сделал хорошую попытку полного решения, но, увы, здесь нет полного решения. Я потратил пару часов, выясняя вещи, и вот мое полное решение с подробным объяснением внизу:
<?xml version="1.0" encoding="utf-8"?>
<ScrollView
    xmlns:android="http://schemas.android.com/apk/res/android"
    android:layout_width="match_parent"
    android:layout_height="match_parent"
    android:fillViewport="true">

    <RelativeLayout
        android:layout_width="match_parent"
        android:layout_height="wrap_content"
        android:padding="10dp">

        <RelativeLayout
            android:layout_width="match_parent"
            android:layout_height="wrap_content"
            android:layout_above="@+id/mainLayout"
            android:layout_alignParentTop="true"
            android:id="@+id/headerLayout">

            <LinearLayout
                android:layout_width="match_parent"
                android:layout_height="wrap_content"
                android:layout_centerVertical="true"
                android:gravity="center_horizontal">

                <TextView
                    android:layout_width="wrap_content"
                    android:layout_height="wrap_content"
                    android:id="@+id/textView1"
                    android:text="facebook"
                    android:textStyle="bold"
                    android:ellipsize="marquee"
                    android:singleLine="true"
                    android:textAppearance="?android:attr/textAppearanceLarge" />

            </LinearLayout>

        </RelativeLayout>

        <LinearLayout
            android:layout_width="match_parent"
            android:layout_height="wrap_content"
            android:layout_centerVertical="true"
            android:id="@+id/mainLayout"
            android:orientation="vertical">

            <EditText
                android:layout_width="match_parent"
                android:layout_height="wrap_content"
                android:id="@+id/editText1"
                android:ems="10"
                android:hint="Email or Phone"
                android:inputType="textVisiblePassword">

                <requestFocus />
            </EditText>

            <EditText
                android:layout_width="match_parent"
                android:layout_height="wrap_content"
                android:layout_marginTop="10dp"
                android:id="@+id/editText2"
                android:ems="10"
                android:hint="Password"
                android:inputType="textPassword" />

            <Button
                android:layout_width="match_parent"
                android:layout_height="wrap_content"
                android:layout_marginTop="10dp"
                android:id="@+id/button1"
                android:text="Log In"
                android:onClick="login" />

        </LinearLayout>

        <RelativeLayout
            android:layout_width="match_parent"
            android:layout_height="wrap_content"
            android:layout_alignParentBottom="true"
            android:layout_below="@+id/mainLayout"
            android:id="@+id/footerLayout">

            <LinearLayout
                android:layout_width="match_parent"
                android:layout_height="wrap_content"
                android:layout_alignParentBottom="true">

                <RelativeLayout
                    android:layout_width="match_parent"
                    android:layout_height="wrap_content">

                    <TextView
                        android:layout_width="wrap_content"
                        android:layout_height="wrap_content"
                        android:id="@+id/textView2"
                        android:text="Sign Up for Facebook"
                        android:layout_centerHorizontal="true"
                        android:layout_alignBottom="@+id/helpButton"
                        android:ellipsize="marquee"
                        android:singleLine="true"
                        android:textAppearance="?android:attr/textAppearanceSmall" />

                    <Button
                        android:layout_width="wrap_content"
                        android:layout_height="wrap_content"
                        android:layout_alignParentRight="true"
                        android:id="@+id/helpButton"
                        android:text="\?"
                        android:onClick="help" />

                </RelativeLayout>

            </LinearLayout>

        </RelativeLayout>

    </RelativeLayout>

</ScrollView>
и AndroidManifest.в XML, не забудьте установить:
android:windowSoftInputMode="adjustResize"
на <activity> - тег, который вам нужна такая планировка.
мысли:
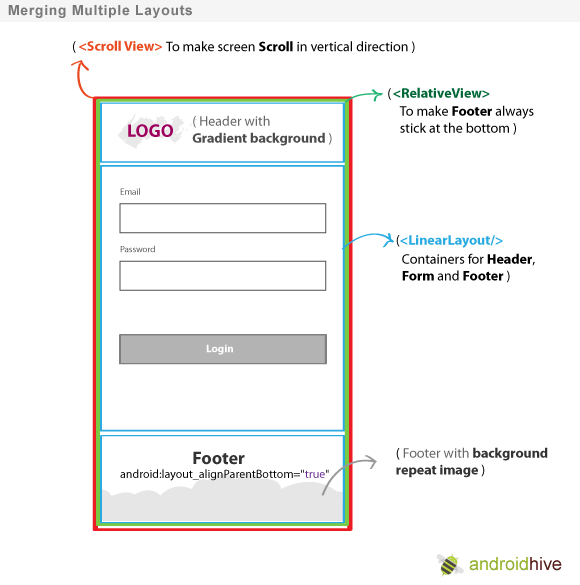
я понял, что RelativeLayout это макеты, которые охватывают все доступное пространство, а затем изменяются при появлении клавиатуры.
и LinearLayout - это макеты, которые не изменяются в процессе изменения размера.
вот почему вам нужно иметь 1 RelativeLayout сразу после ScrollView чтобы охватить все доступное пространство экрана. И вам нужно иметь LinearLayout внутри RelativeLayout еще внутренности будут раздавлены при изменении размера. Хороший пример - "headerLayout". Если бы не было LinearLayout внутри RelativeLayout текст "facebook" будет раздавлен и не будет показан.
в фотографиях входа в систему "facebook", размещенных в вопросе, я также заметил, что вся часть входа (mainLayout) центрирована по вертикали по отношению ко всему экрану, следовательно, атрибут:
android:layout_centerVertical="true"
на LinearLayout макет. И потому, что mainLayout находится внутри LinearLayout это означает, что эта часть не изменяется (снова см. рисунок в вопросе).
добавить эту строку в манифест, где ваша деятельность называется
android:windowSoftInputMode="adjustPan|adjustResize"
или
вы можете добавить эту строку в ваш onCreate
getWindow().setSoftInputMode(WindowManager.LayoutParams.SOFT_INPUT_STATE_VISIBLE|WindowManager.LayoutParams.SOFT_INPUT_ADJUST_RESIZE);
разработчик Android имеет правильный ответ, но предоставленный исходный код довольно подробный и фактически не реализует шаблон, описанный на диаграмме.
вот лучший шаблон:
<?xml version="1.0" encoding="utf-8"?>
<ScrollView xmlns:android="http://schemas.android.com/apk/res/android"
            android:layout_width="match_parent"
            android:layout_height="match_parent"
            android:fillViewport="true">

    <RelativeLayout android:layout_width="match_parent"
                    android:layout_height="match_parent">

        <LinearLayout android:layout_width="match_parent"
                      android:layout_height="wrap_content"
                      android:orientation="vertical">

                <!-- stuff to scroll -->

        </LinearLayout>

        <FrameLayout
            android:layout_width="match_parent"
            android:layout_height="wrap_content"
            android:layout_alignParentBottom="true">

            <!-- footer -->

        </FrameLayout>

    </RelativeLayout>

</ScrollView>
вам решать, какие виды вы используете для" прокрутки "и" нижнего колонтитула " частей. Также знайте, что вам, вероятно, придется установить ScrollViews
fillViewPort .
Он может работать для всех видов макета.
-
добавьте это в свой тег активности в AndroidManyfest.XML android: windowSoftInputMode= " adjustResize" например:
-
добавьте это в свой тег макета в activitypage.xml, который изменит свою позицию. android: fitsSystemWindows= "true" и android: layout_alignParentBottom= " true" например:
Это позволяет показать любой разыскиваемый макет, ранее скрытый клавиатурой.
добавьте это в тег activity в AndroidManifest.в XML
android: windowSoftInputMode= "adjustResize"
Окружите корневое представление ScrollView, предпочтительно с полосами прокрутки=нет. ScrollView правильно не изменит ничего с вашим макетом, кроме как использовать для решения этой проблемы.
и затем установить fitsSystemWindows= "true" в представлении, которое вы хотите сделать полностью показанным над клавиатурой. Это сделает ваш EditText видимым над клавиатурой и позволит прокручивать вниз до частей ниже EditText, но в представлении с fitsSystemWindows="true".
android: fitsSystemWindows= "true"
например:
<ScrollView
    android:id="@+id/scrollView"
    android:layout_width="match_parent"
    android:layout_height="match_parent"
    android:scrollbars="none">

    <android.support.constraint.ConstraintLayout
        android:layout_width="match_parent"
        android:layout_height="wrap_content"
        android:fitsSystemWindows="true">

        ...

    </android.support.constraint.ConstraintLayout>
</ScrollView>
Если вы хотите показать полную часть fitsSystemWindows= "true" вид над клавиатурой в момент появится клавиатура, вам понадобится какой-то код для прокрутки вида вниз:
// Code is in Kotlin

setupKeyboardListener(scrollView) // call in OnCreate or similar


private fun setupKeyboardListener(view: View) {
    view.viewTreeObserver.addOnGlobalLayoutListener {
        val r = Rect()
        view.getWindowVisibleDisplayFrame(r)
        if (Math.abs(view.rootView.height - (r.bottom - r.top)) > 100) { // if more than 100 pixels, its probably a keyboard...
            onKeyboardShow()
        }
    }
}

private fun onKeyboardShow() {
    scrollView.scrollToBottomWithoutFocusChange()
}

fun ScrollView.scrollToBottomWithoutFocusChange() { // Kotlin extension to scrollView
    val lastChild = getChildAt(childCount - 1)
    val bottom = lastChild.bottom + paddingBottom
    val delta = bottom - (scrollY + height)
    smoothScrollBy(0, delta)
}
полный макет пример:
<android.support.constraint.ConstraintLayout
    android:layout_width="match_parent"
    android:layout_height="wrap_content"
    android:fitsSystemWindows="true">

    <RelativeLayout
        android:id="@+id/statisticsLayout"
        android:layout_width="match_parent"
        android:layout_height="340dp"
        android:background="@drawable/some"
        app:layout_constraintEnd_toEndOf="parent"
        app:layout_constraintStart_toStartOf="parent"
        app:layout_constraintTop_toTopOf="parent">

        <ImageView
            android:id="@+id/logoImageView"
            android:layout_width="match_parent"
            android:layout_height="wrap_content"
            android:layout_marginTop="64dp"
            android:src="@drawable/some"
            app:layout_constraintEnd_toEndOf="parent"
            app:layout_constraintStart_toStartOf="parent"
            app:layout_constraintTop_toTopOf="parent" />

    </RelativeLayout>

    <RelativeLayout
        android:id="@+id/authenticationLayout"
        android:layout_width="match_parent"
        android:layout_height="match_parent"
        android:layout_marginEnd="32dp"
        android:layout_marginStart="32dp"
        android:layout_marginTop="20dp"
        android:focusableInTouchMode="true"
        app:layout_constraintBottom_toBottomOf="parent"
        app:layout_constraintEnd_toEndOf="parent"
        app:layout_constraintStart_toStartOf="parent"
        app:layout_constraintTop_toBottomOf="@id/statisticsLayout">

        <android.support.design.widget.TextInputLayout
            android:id="@+id/usernameEditTextInputLayout"
            android:layout_width="match_parent"
            android:layout_height="68dp">

            <EditText
                android:id="@+id/usernameEditText"
                android:layout_width="match_parent"
                android:layout_height="wrap_content" />

        </android.support.design.widget.TextInputLayout>

        <android.support.design.widget.TextInputLayout
            android:id="@+id/passwordEditTextInputLayout"
            android:layout_width="match_parent"
            android:layout_height="wrap_content"
            android:layout_below="@id/usernameEditTextInputLayout">

            <EditText
                android:id="@+id/passwordEditText"
                android:layout_width="match_parent"
                android:layout_height="wrap_content" />

        </android.support.design.widget.TextInputLayout>

        <Button
            android:id="@+id/loginButton"
            android:layout_width="wrap_content"
            android:layout_height="wrap_content"
            android:layout_below="@id/passwordEditTextInputLayout"
            android:layout_centerHorizontal="true"
            android:layout_marginBottom="10dp"
            android:layout_marginTop="20dp" />

        <Button
            android:id="@+id/forgotPasswordButton"
            android:layout_width="wrap_content"
            android:layout_height="40dp"
            android:layout_below="@id/loginButton"
            android:layout_centerHorizontal="true" />

    </RelativeLayout>

</android.support.constraint.ConstraintLayout>
в моем случае это помогло.
main_layout.в XML
<?xml version="1.0" encoding="utf-8"?>
<LinearLayout xmlns:android="http://schemas.android.com/apk/res/android"
    xmlns:tools="http://schemas.android.com/tools"
    android:id="@+id/activity_main2"
    android:layout_width="match_parent"
    android:layout_height="match_parent"
    android:paddingBottom="@dimen/activity_vertical_margin"
    android:paddingLeft="@dimen/activity_horizontal_margin"
    android:paddingRight="@dimen/activity_horizontal_margin"
    android:paddingTop="@dimen/activity_vertical_margin"
    android:orientation="vertical"
    tools:context="com.livewallpaper.profileview.loginact.Main2Activity">

<TextView
    android:layout_weight="1"
    android:layout_width="match_parent"
    android:text="Title"
    android:gravity="center"
    android:layout_height="0dp" />
<LinearLayout
    android:layout_weight="1"
    android:layout_width="match_parent"
    android:layout_height="0dp">
    <EditText
        android:hint="enter here"
        android:layout_width="match_parent"
        android:layout_height="wrap_content" />
</LinearLayout>
<TextView
    android:layout_weight="1"
    android:text="signup for App"
    android:gravity="bottom|center_horizontal"
    android:layout_width="match_parent"
    android:layout_height="0dp" />
</LinearLayout>
использовать это в
<activity android:name=".MainActivity"
        android:screenOrientation="portrait"
        android:windowSoftInputMode="adjustResize"/>
теперь самая важная часть!
Используйте тему, как это в любом Activity или Application тег.
android:theme="@style/AppTheme"
и тема tooks, как это
<style name="AppTheme" parent="Theme.AppCompat.Light.DarkActionBar">
    <!-- Customize your theme here. -->
    <item name="colorPrimary">@color/colorPrimary</item>
    <item name="colorPrimaryDark">@color/colorPrimaryDark</item>
    <item name="colorAccent">@color/colorAccent</item>
    <item name="windowActionBar">false</item>
    <item name="windowNoTitle">true</item>
    <item name="windowActionModeOverlay">true</item>
</style>
Итак, я пропустил тему. Что заставляло меня расстраиваться весь день.
Вы можете просто установить эти параметры в AndroidManifest.XML-файл.
<activity
    android:name=".YourACtivityName"
    android:windowSoftInputMode="stateVisible|adjustResize">
использование adjustPan Не рекомендуется Google, потому что пользователю может потребоваться закрыть клавиатуру, чтобы увидеть все поля ввода.
Подробнее: Манифест Приложения Для Android
для меня это сработало с этой строкой кода:
getActivity().getWindow().setSoftInputMode(WindowManager.LayoutParams.SOFT_INPUT_ADJUST_PAN);
просто поместите его в метод onCreate. Лучше!