как вставить макет в макет в android?
у меня есть два варианта первый и второй, я хочу вставить второй в первую. Я хочу вставить второй макет в макет, который имеет id @+id/layout когда я нажимаю кнопку Get Layout, он показывает второй макет в нижней части кнопки
первый макет
<LinearLayout xmlns:android="http://schemas.android.com/apk/res/android"
xmlns:tools="http://schemas.android.com/tools"
android:layout_width="match_parent"
android:layout_height="match_parent"
android:orientation="vertical" >

    <Button
    android:id="@+id/btn_get_layout"
    android:layout_width="wrap_content"
    android:layout_height="wrap_content"
    android:text="Get Layout" />

<LinearLayout
    android:id="@+id/layout"
    android:layout_width="match_parent"
    android:layout_height="match_parent"
    android:orientation="vertical" >

</LinearLayout>

</LinearLayout>
второй макет
<?xml version="1.0" encoding="utf-8"?>
<LinearLayout xmlns:android="http://schemas.android.com/apk/res/android"
android:layout_width="match_parent"
android:layout_height="match_parent"
android:background="@drawable/card_base"
android:orientation="vertical" >


<RelativeLayout
    android:layout_width="match_parent"
    android:layout_height="match_parent" >

    <ImageView
        android:id="@+id/img_cover"
        android:layout_width="fill_parent"
        android:layout_height="fill_parent"
        android:layout_alignParentLeft="true"
        android:layout_alignParentTop="true"
        android:layout_margin="10dp"
        android:scaleType="fitXY"
        android:src="@drawable/card_beauty" />

    <ImageView
        android:id="@+id/img_photo"
        android:layout_width="match_parent"
        android:layout_height="match_parent"
        android:layout_alignParentLeft="true"
        android:layout_alignParentTop="true"
        android:layout_margin="20dp"
        android:scaleType="fitXY"
        android:src="@drawable/sample_0" />
</RelativeLayout>

</LinearLayout>
5 ответов
    LinearLayout placeHolder = (LinearLayout) findViewByid(R.id.layout);
    getLayoutInflater().inflate(R.layout.second_layout, placeHolder);
Если я правильно понял, вы должны использовать следующий код в своем первом макете
<include
     layout="@layout/second_layout"
     android:id="@+id/includedLayout"
     android:visibility="gone"
     android:layout_below="@id/buttonId" />
и затем в действии вашей кнопки вы просто используете
((RelativeLayout)findViewById(R.id.includedLayout)).setVisibility(View.VISIBLE);
использовать include
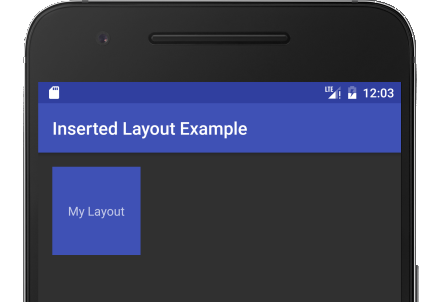
вот более полный пример. Квадратный синий макет вставляется в основной макет с помощью include.
activity_main.в XML
это основной макет. На пользовательский макет ссылаются с помощью include. Здесь можно переопределить любой из атрибутов, тоже.
<?xml version="1.0" encoding="utf-8"?>
<RelativeLayout
    xmlns:android="http://schemas.android.com/apk/res/android"
    android:layout_width="match_parent"
    android:layout_height="match_parent"
    android:padding="16dp">

    <!-- Here is the inserted layout -->
    <include layout="@layout/my_layout"/>

</RelativeLayout>
my_layout.в XML
это пользовательский макет, который будет вставлен в основной макет.
<?xml version="1.0" encoding="utf-8"?>
<RelativeLayout
    xmlns:android="http://schemas.android.com/apk/res/android"
    android:layout_width="100dp"
    android:layout_height="100dp"
    android:background="@color/colorPrimary">

    <TextView
        android:layout_width="wrap_content"
        android:layout_height="wrap_content"
        android:layout_centerInParent="true"
        android:padding="5dp"
        android:text="My Layout"/>

</RelativeLayout>
используйте LayoutInflator для раздувания внешнего макета в существующий макет. Оформить заказ LayoutInflater на сайте Android Dev для получения дополнительной информации об этом.
вы должны использовать этот фрагмент кода, чтобы добавить макет внутри другого.
    parentLayout=(LinearLayout)findViewById(R.id.parentLayout);
    inflateView=View.inflate(this,R.layout.view_video,parentLayout);
parentLayoutявляется корневым представлением и R.layout.view_video - это макет, который нужно вставить.
